How to Make Witch Hat Halloween Cookies Easily
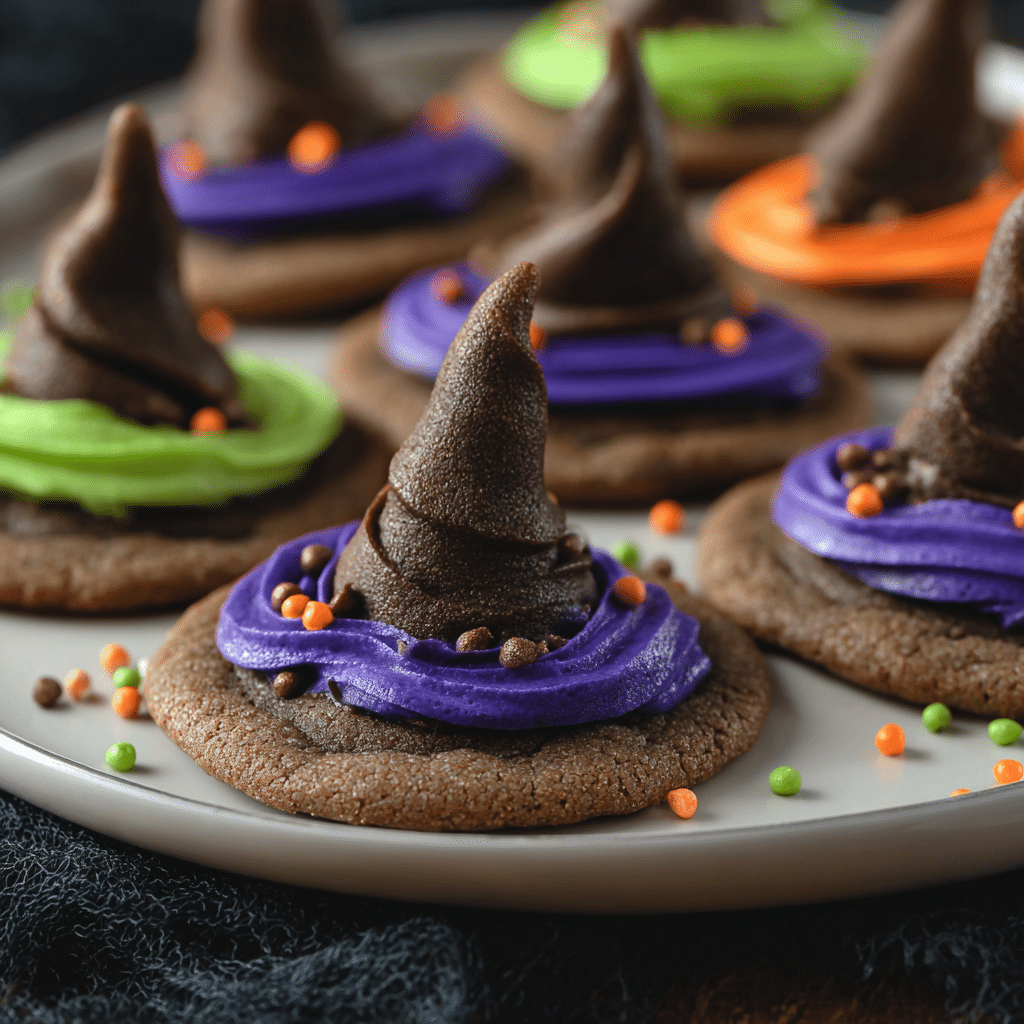
If you’re looking for a delightful and spooky treat this Halloween, you can’t go wrong with Witch Hat Halloween Cookies. These charming little confections combine cute, eerie aesthetics with a crisp, buttery bite that’s perfect for parties, gatherings, or just satisfying that seasonal sweet tooth. With a simple recipe and a handful of ingredients, these cookies are as fun to make as they are to eat, bringing a festive touch to your holiday celebrations with every crunchy, decorated bite.
Why You’ll Love This Recipe
- Easy to Follow: Clear step-by-step instructions make these cookies accessible for bakers of all levels.
- Festive and Fun: Their unique witch hat design adds a playful and spooky vibe to any Halloween spread.
- Perfect for Kids: Baking and decorating these cookies is a hands-on activity that kids will enjoy and memories they’ll cherish.
- Customizable Flavors: The basic dough allows plenty of room for creative tweaks in flavor and decoration.
- Great for Parties: These cookies are sure to be conversation starters and crowd-pleasers at any Halloween event.
Ingredients You’ll Need
The ingredients for Witch Hat Halloween Cookies are straightforward but essential to get the perfect crunch and rich flavor. Each component plays a part in achieving a buttery, golden cookie base that holds up beautifully to the fun decorations.
- All-purpose flour: The foundation of the cookie dough, providing structure and texture.
- Unsalted butter: Adds richness and helps create that tender, melt-in-your-mouth consistency.
- Sugar: Sweetens and crisps the cookie’s edges just right.
- Egg: Binds all ingredients and contributes to the dough’s softness.
- Vanilla extract: Enhances the overall flavor with comforting warmth.
- Cocoa powder: Optional but key for a chocolaty twist that complements the witchy theme.
- Chocolate kisses or chocolate chips: Used as the hat’s peak for that adorable signature look.
- Colored icing or edible markers: Adds the finishing festive touches and personality.
- Mini fondant or candy decorations: Optional accents like buckles or stars to make your hats extra special.
Variations for Witch Hat Halloween Cookies
Getting creative with Witch Hat Halloween Cookies is part of the fun! Whether you’re adapting for dietary needs or simply want to mix up flavors and colors, these variations keep the base recipe fresh and exciting.
- Gluten-Free Version: Swap all-purpose flour for a gluten-free blend without losing texture.
- Vegan Adaptation: Use plant-based butter and flaxseed “eggs” to make it suitable for vegans.
- Spiced Cookies: Add cinnamon, ginger, or nutmeg for a cozy autumn twist.
- Colorful Icing Themes: Use orange, purple, or green icing to brighten your witches’ hats.
- Peanut Butter Option: Mix in peanut butter for a nutty, rich flavor that pairs well with chocolate hats.

How to Make Witch Hat Halloween Cookies
Step 1: Prepare the Dough
Begin by beating softened unsalted butter and sugar together until light and fluffy. Add the egg and vanilla extract, mixing until well combined. Gradually incorporate the all-purpose flour (and cocoa powder if using) until a smooth dough forms. Chill the dough for 30 minutes to make it easier to handle.
Step 2: Shape the Cookies
Roll out the chilled dough to about a quarter-inch thickness on a lightly floured surface. Using a round cookie cutter, cut out circles for the witch hat brims. Then, use a smaller cutter or knife to cut out triangles from the dough to form the pointed tops of the hats.
Step 3: Bake Until Golden
Arrange the cookie shapes on a parchment-lined baking sheet, leaving some space between them. Bake at 350°F (175°C) for approximately 10-12 minutes or until edges are lightly golden. Let the cookies cool completely before decorating.
Step 4: Assemble the Witch Hats
Use a dab of icing or melted chocolate to attach the triangle shapes onto the round cookie bases, creating the classic witch hat shape. Place a chocolate kiss or chocolate chip at the hat’s tip for that iconic look.
Step 5: Decorate Creatively
Once assembled, add colorful icing to outline hat bands, create buckles, or add spooky details like stars or spider webs with edible markers or piped frosting.
Pro Tips for Making Witch Hat Halloween Cookies
- Chill Your Dough: It’s crucial to chill the dough to avoid spreading during baking.
- Use Parchment Paper: Prevents sticking and allows easy cleanup.
- Don’t Overbake: Cookies should be slightly soft in the center when removed as they firm up while cooling.
- Attachment Tip: Use warm melted chocolate or royal icing for stronger cookie assembly hold.
- Personalize Decorations: Keep extra icing colors on hand for fun, customizable designs.
How to Serve Witch Hat Halloween Cookies
Garnishes
Enhance your presentation by sprinkling edible glitter, sugar crystals, or tiny candy spiders around the cookies for an extra spooky touch that dazzles on party platters.
Side Dishes
Pair these cookies with a warm cup of spiced apple cider or a rich hot chocolate to keep with the Halloween festive feeling and provide a cozy balance to the crunchy treat.
Creative Ways to Present
Try arranging your Witch Hat Halloween Cookies on a tiered stand decorated with mini pumpkins and cobwebs or place them in themed goodie bags for guests to take home a magical taste of Halloween.
Make Ahead and Storage
Storing Leftovers
Store the cookies in an airtight container at room temperature for up to a week to maintain freshness and crunch. Avoid stacking without separation to keep decorations intact.
Freezing
To freeze, place cookies in a single layer on a baking sheet to freeze solid, then transfer to a freezer-safe container with parchment between layers. Freeze for up to 3 months and thaw at room temperature before decorating.
Reheating
Warming the cookies slightly in the oven at 300°F (150°C) for 3 to 5 minutes can refresh their crispness, but be cautious not to melt any delicate icing decorations.
FAQs
Can I make Witch Hat Halloween Cookies gluten-free?
Absolutely! Simply substitute the all-purpose flour with a quality gluten-free baking blend for a delicious gluten-free alternative without compromising texture.
What can I use instead of chocolate kisses for the hat tips?
You can use mini chocolate chips, candy corn tips, or even candy-coated chocolates depending on your flavor preference and festive look.
How long do these cookies stay fresh?
Stored properly in an airtight container, Witch Hat Halloween Cookies can stay fresh for up to one week at room temperature.
Are these cookies suitable for making ahead of time?
Yes, you can prepare the dough and freeze it, or bake the cookies ahead and store or freeze them for later decorating and serving.
Can I share this recipe with friends?
Definitely! This recipe is perfect for sharing and makes a great activity for Halloween parties or family get-togethers.
Final Thoughts
Making Witch Hat Halloween Cookies is such a joyful way to bring the spirit of Halloween into your home, combining creativity, deliciousness, and festivity in every bite. Whether baking with family or preparing treats for a party, this easy recipe will soon become a seasonal favorite you can’t wait to share year after year. So grab your ingredients, unleash your imagination, and bake some magic today!
Related Posts
- Why Salted Caramel Apple Cheesecake Pie is a Must-Try
- Why Salted Caramel Apple Cheesecake Pie is a Must-Try
- How to Make Pumpkin Spice Crème Brûlée
Witch Hat Halloween Cookies

Witch Hat Halloween Cookies are charming, festive treats perfect for celebrating Halloween. These crisp, buttery cookies feature a unique witch hat design with decorative chocolate tips and colorful icing, making them fun to bake, decorate, and share at parties or family gatherings. Easy to prepare and customizable for various dietary preferences, they bring a delightful spooky touch to any holiday spread.
- Prep Time: 15 minutes
- Cook Time: 12 minutes
- Total Time: 45 minutes
- Yield: 24 cookies 1x
- Category: Appetizers
- Method: Baking
- Cuisine: American
- Diet: Gluten Free
Ingredients
Base Cookie Dough
- 2 1/4 cups all-purpose flour (or gluten-free blend for gluten-free version)
- 1 cup unsalted butter, softened
- 3/4 cup sugar
- 1 large egg
- 1 teaspoon vanilla extract
- 2 tablespoons cocoa powder (optional)
Decorations
- Chocolate kisses or mini chocolate chips (for hat tips)
- Colored icing or edible markers (orange, purple, green recommended)
- Mini fondant or candy decorations (optional, for buckles or stars)
Instructions
- Prepare the Dough: Begin by beating softened unsalted butter and sugar together until light and fluffy. Add the egg and vanilla extract, mixing until well combined. Gradually incorporate the all-purpose flour and cocoa powder if using, until a smooth dough forms. Chill the dough for 30 minutes to make it easier to handle.
- Shape the Cookies: Roll out the chilled dough to about a quarter-inch thickness on a lightly floured surface. Using a round cookie cutter, cut out circles for the witch hat brims. Then, use a smaller cutter or knife to cut out triangles from the dough to form the pointed tops of the hats.
- Bake Until Golden: Arrange the cookie shapes on a parchment-lined baking sheet, leaving some space between them. Bake at 350°F (175°C) for approximately 10-12 minutes or until edges are lightly golden. Let the cookies cool completely before decorating.
- Assemble the Witch Hats: Use a dab of icing or melted chocolate to attach the triangle shapes onto the round cookie bases, creating the classic witch hat shape. Place a chocolate kiss or chocolate chip at the hat’s tip for that iconic look.
- Decorate Creatively: Once assembled, add colorful icing to outline hat bands, create buckles, or add spooky details like stars or spider webs with edible markers or piped frosting.
Notes
- Chill your dough to prevent cookies from spreading while baking.
- Use parchment paper on baking sheets for easy cleanup and to prevent sticking.
- Remove cookies slightly soft in the center as they will firm up while cooling.
- Use warm melted chocolate or royal icing to ensure stronger adhesion when assembling hats.
- Keep extra icing colors on hand to personalize your cookie decorations.
Nutrition
- Serving Size: 1 cookie
- Calories: 120
- Sugar: 8g
- Sodium: 45mg
- Fat: 7g
- Saturated Fat: 4g
- Unsaturated Fat: 3g
- Trans Fat: 0g
- Carbohydrates: 15g
- Fiber: 1g
- Protein: 1g
- Cholesterol: 20mg
Keywords: Halloween, Witch Hat Cookies, Spooky Treats, Festive Cookies, Party Snacks, Gluten-Free Cookies