How to Make Halloween Pumpkin Cookies with Ghost Decorations
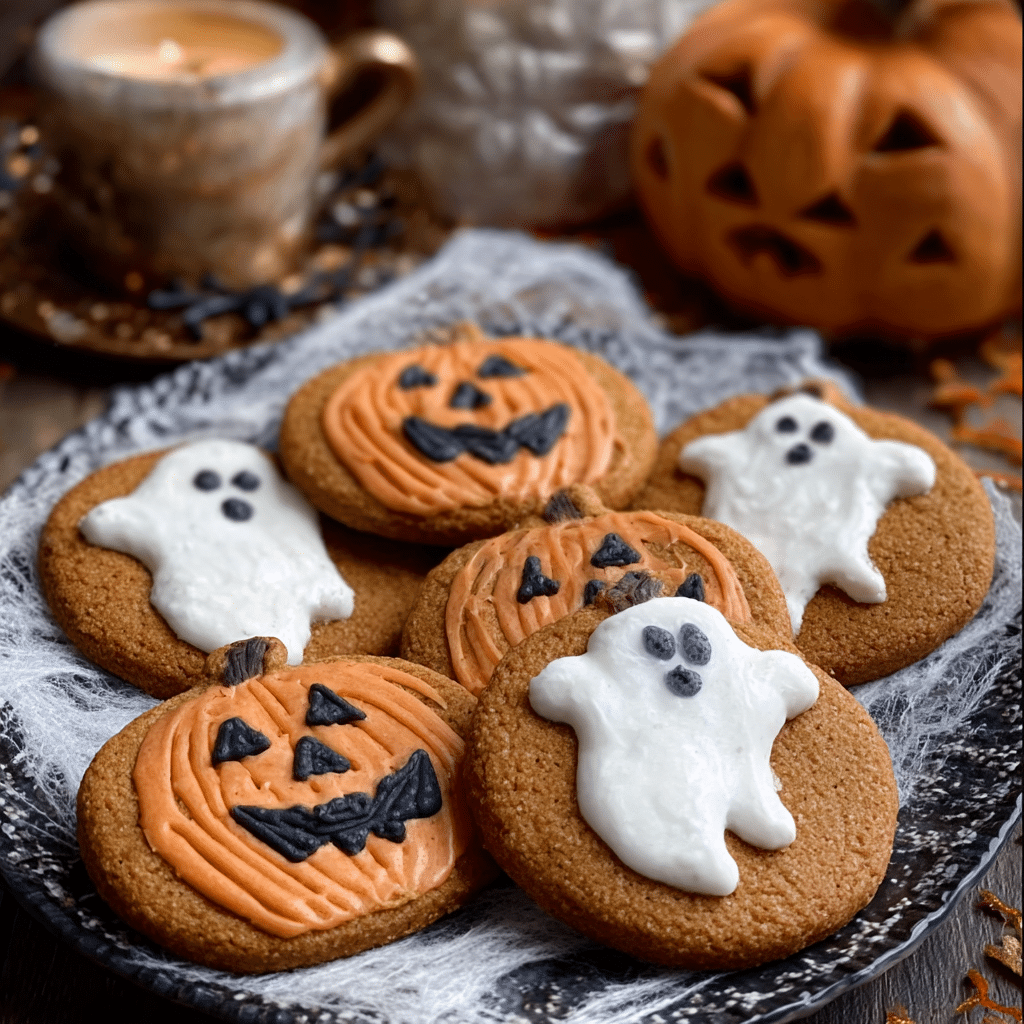
Get ready to delight your taste buds and wow your friends with this charming and delicious recipe for Halloween Pumpkin Cookies with Ghost Decorations. These festive cookies combine the warm, comforting flavors of pumpkin spice with a playful ghost-themed icing that makes them perfect for every spooky celebration. Whether you’re baking for a party, a classroom treat, or simply to indulge yourself, this recipe brings fun, flavor, and festivity to your holiday baking table.
Why You’ll Love This Recipe
- Easy to Bake: The recipe uses simple ingredients and straightforward steps, making it perfect for bakers of all skill levels.
- Perfect Halloween Vibes: The pumpkin and ghost decorations create a fun and seasonal look that kids and adults adore.
- Moist and Flavorful: The pumpkin adds moisture and depth to the cookies, so they’re soft, tender, and bursting with autumnal taste.
- Great for Sharing: These cookies are a crowd-pleaser at any Halloween party or gathering.
- Customizable Decoration: The ghost designs can be personalized with different expressions for a unique homemade touch.
Ingredients You’ll Need
Gathering the right ingredients is essential to getting the perfect balance of flavor and texture in your Halloween Pumpkin Cookies with Ghost Decorations. Each item plays a crucial role, from the spicy warmth of pumpkin to the sweetness of the icing that brings the ghosts to life.
- Pumpkin Puree: Use canned or fresh pumpkin to infuse that unmistakable fall flavor and keep the cookies moist.
- All-Purpose Flour: Provides structure while keeping the cookies tender and soft.
- Brown Sugar: Adds a rich, caramel-like sweetness that complements the pumpkin.
- Ground Cinnamon and Nutmeg: These spices deliver the classic pumpkin spice aroma and depth.
- Baking Powder: Helps the cookies rise just enough, keeping them light.
- Butter: Adds richness and a slight crispness to the edges.
- Egg: Binds all the ingredients and adds moisture.
- Vanilla Extract: Enhances the flavors and adds warmth.
- Powdered Sugar: Essential for the smooth, sweet ghost icing.
- Milk or Cream: To create the perfect consistency for your icing.
- Black Food Coloring or Edible Ink Pen: For drawing the ghost’s eyes and mouth details.
Variations for Halloween Pumpkin Cookies with Ghost Decorations
This recipe is wonderfully versatile, allowing you to tweak it to your preference or dietary needs without losing its spooky charm. Feel free to experiment and make it your own!
- Gluten-Free: Substitute all-purpose flour with a gluten-free baking blend to accommodate dietary needs.
- Vegan-Friendly: Use coconut oil instead of butter, flax eggs instead of real eggs, and a plant-based milk for the icing.
- Spice It Up: Add a pinch of ground cloves or ginger for a warming twist to the pumpkin spice flavor.
- Colorful Icings: Try dyeing the ghost icing with pastel colors or add edible glitter for extra sparkle.
- Pumpkin Seed Toppings: Sprinkle roasted pumpkin seeds on top for added crunch and an earthy contrast.

How to Make Halloween Pumpkin Cookies with Ghost Decorations
Step 1: Prepare Your Ingredients
Start by gathering all your ingredients and preheating your oven to 350°F (175°C). This ensures a smooth baking process with no delays.
Step 2: Mix the Wet Ingredients
In a large bowl, cream the softened butter and brown sugar together until fluffy and light. Beat in the egg, then add pumpkin puree and vanilla extract, mixing until fully combined and smooth.
Step 3: Combine the Dry Ingredients
In a separate bowl, whisk together the flour, baking powder, cinnamon, nutmeg, and a pinch of salt. This evenly distributes the leavening and spices for consistent flavor in every bite.
Step 4: Make the Cookie Dough
Gradually add the dry ingredients to the wet mixture, stirring gently just until combined. Avoid overmixing to keep the cookies tender.
Step 5: Shape and Bake
Use a spoon or cookie scoop to drop dough onto a parchment-lined baking sheet, spacing them about 2 inches apart. Flatten each cookie slightly with your fingers for even baking. Bake in the preheated oven for 12-15 minutes or until the edges begin to turn golden.
Step 6: Cool Before Decorating
Remove cookies from the oven and let them cool on the baking sheet for 5 minutes before transferring to a wire rack to cool completely. Decorating warm cookies can cause the icing to melt.
Step 7: Prepare the Ghost Icing
Mix powdered sugar with a little milk or cream until you get a smooth, pipeable consistency. For best results, make the icing opaque but soft enough to spread easily over the cookies.
Step 8: Decorate the Ghosts
Spread or pipe the white icing on each cookie to create the ghost’s body. Use black food coloring or an edible ink pen to draw eyes and a spooky or silly mouth on each ghost. Let the icing set at room temperature.
Pro Tips for Making Halloween Pumpkin Cookies with Ghost Decorations
- Softened Butter: Make sure the butter is room temperature for easier creaming and smoother dough.
- Chill the Dough: For thicker cookies, chill the dough for 30 minutes before baking to prevent spreading.
- Consistent Icing: Use a small offset spatula or piping bag for even ghost shapes and cleaner decorations.
- Don’t Overbake: Cookies should be just set with slightly golden edges to keep them soft and chewy.
- Drying Time: Allow decorated cookies to dry completely before stacking or packing to avoid smudges.
How to Serve Halloween Pumpkin Cookies with Ghost Decorations
Garnishes
Add a light dusting of cinnamon sugar or edible glitter to the ghost icing for an enchanting sparkle that brightens your Halloween spread and adds extra fall flavor.
Side Dishes
Pair these cookies with a warm cup of spiced apple cider or a creamy pumpkin latte to keep your taste buds dancing in fall flavors.
Creative Ways to Present
Arrange the decorated cookies on a festive platter or layer them inside a clear vase with orange and black ribbons for eye-catching party table décor that invites guests to indulge.
Make Ahead and Storage
Storing Leftovers
Keep your Halloween Pumpkin Cookies with Ghost Decorations fresh by storing them in an airtight container at room temperature for up to 5 days. Separate layers with parchment paper to protect the delicate icing.
Freezing
You can freeze these cookies either before or after decorating. For best results, freeze them undecorated in a single layer on a baking sheet, then transfer to a freezer bag. Thaw completely before decorating or serving.
Reheating
While these cookies are best enjoyed fresh, you can gently warm them in the microwave for about 10 seconds for a soft, cozy bite, but avoid heating decorated areas to preserve the icing look.
FAQs
Can I use fresh pumpkin instead of canned?
Yes, fresh pumpkin can be used as a substitute. Just cook and puree it until smooth, and ensure it’s well drained to avoid excess moisture in the dough.
How long will the cookies stay fresh?
Stored properly in an airtight container at room temperature, these cookies will stay fresh for up to 5 days, maintaining their soft texture and flavor.
Can I make the ghost decorations ahead of time?
Yes, you can prepare the ghost icing a day in advance and store it covered in the refrigerator. Let it come to room temperature before decorating.
What if I don’t have an edible ink pen for the ghost faces?
A small paintbrush dipped in black food coloring or melted chocolate works well for drawing eyes and mouths with precision.
Are these cookies suitable for children to help decorate?
Absolutely! Decorating the ghost faces can be a fun, kid-friendly activity that adds a hands-on element to your holiday celebration.
Final Thoughts
There’s something truly magical about baking cookies that capture the spirit of the season, and these Halloween Pumpkin Cookies with Ghost Decorations do just that with charm and deliciousness. Whether you’re a seasoned baker or trying this recipe for the first time, these cookies will bring smiles, festive fun, and incredible flavor to your holiday table. Grab your ingredients, roll up your sleeves, and get ready to create a Halloween treat that everyone will love.
Related Posts
- Irresistible Chocolate Zucchini Muffins Recipe
- Why Zucchini Brownies with Chocolate Chunks Are a Must-Try
- Why Chocolate Zucchini Bread with Chocolate Chips Delights
Halloween Pumpkin Cookies with Ghost Decorations
These Halloween Pumpkin Cookies with Ghost Decorations combine moist, flavorful pumpkin spice cookies with fun and festive ghost-themed icing. Perfect for bakers of all skill levels, these soft and tender cookies bring autumnal warmth and holiday cheer to any spooky celebration, making them ideal for parties, classroom treats, or simply indulging yourself during the fall season.
- Prep Time: 20 minutes
- Cook Time: 12-15 minutes
- Total Time: 35 minutes
- Yield: 24 cookies 1x
- Category: Appetizers
- Method: Baking
- Cuisine: American
- Diet: Gluten Free
Ingredients
Cookie Ingredients
- 1 cup pumpkin puree (canned or fresh)
- 2 1/4 cups all-purpose flour (or gluten-free baking blend for gluten-free option)
- 1 teaspoon baking powder
- 1 teaspoon ground cinnamon
- 1/2 teaspoon ground nutmeg
- 1/4 teaspoon salt
- 1/2 cup unsalted butter, softened (or coconut oil for vegan)
- 3/4 cup brown sugar
- 1 large egg (or flax egg for vegan)
- 1 teaspoon vanilla extract
Ghost Icing Ingredients
- 2 cups powdered sugar
- 2–3 tablespoons milk or cream (or plant-based milk for vegan)
- Black food coloring or edible ink pen (for decorating eyes and mouth)
Instructions
- Prepare Your Ingredients: Gather all ingredients and preheat your oven to 350°F (175°C) to ensure a smooth baking process without delays.
- Mix the Wet Ingredients: In a large bowl, cream the softened butter and brown sugar together until fluffy and light. Beat in the egg, then stir in the pumpkin puree and vanilla extract until fully combined and smooth.
- Combine the Dry Ingredients: In a separate bowl, whisk together the flour, baking powder, cinnamon, nutmeg, and salt to evenly distribute the leavening and spices.
- Make the Cookie Dough: Gradually add the dry ingredients to the wet mixture, stirring gently just until combined to keep the cookies tender. Avoid overmixing.
- Shape and Bake: Use a spoon or cookie scoop to drop dough onto a parchment-lined baking sheet, spacing about 2 inches apart. Flatten each cookie slightly with your fingers for even baking. Bake in the preheated oven for 12-15 minutes or until edges start to turn golden.
- Cool Before Decorating: Remove cookies from the oven and let them cool on the baking sheet for 5 minutes. Transfer to a wire rack to cool completely to prevent icing from melting.
- Prepare the Ghost Icing: Mix powdered sugar with milk or cream until smooth and pipeable. The icing should be opaque but soft enough to spread easily over the cookies.
- Decorate the Ghosts: Spread or pipe white icing on each cookie to form the ghost’s body. Use black food coloring or an edible ink pen to draw eyes and a spooky or silly mouth. Let icing set at room temperature before serving or storing.
Notes
- Use room temperature softened butter for easier creaming and smoother dough.
- Chill dough for 30 minutes before baking for thicker cookies and to prevent spreading.
- Use a small offset spatula or piping bag for clean and consistent ghost icing shapes.
- Do not overbake cookies; edges should be just golden to keep them soft and chewy.
- Allow decorated cookies to dry completely before stacking or packing to avoid smudging.
Nutrition
- Serving Size: 1 cookie
- Calories: 130
- Sugar: 10g
- Sodium: 75mg
- Fat: 5g
- Saturated Fat: 3g
- Unsaturated Fat: 2g
- Trans Fat: 0g
- Carbohydrates: 20g
- Fiber: 1g
- Protein: 1g
- Cholesterol: 20mg
Keywords: Halloween, pumpkin cookies, ghost decoration, pumpkin spice, festive cookies, fall baking, gluten-free cookies