Irresistible Chocolate Peanut Butter Dream Bars Recipe

If you’re craving a dessert that perfectly balances rich chocolate and creamy peanut butter, look no further than these Chocolate Peanut Butter Dream Bars. This delightful treat brings together the best of both flavors in a simple, no-fuss recipe that’s quick to make and irresistibly satisfying. Whether you’re baking for a special occasion or just treating yourself after a long day, these bars deliver a soft, indulgent texture with every bite and a flavor combo that’s always a crowd-pleaser.
Why You’ll Love This Recipe
- Easy to Make: With just a handful of ingredients and straightforward steps, these bars come together quickly even if you’re new to baking.
- Rich Flavor Pairing: The smooth peanut butter perfectly complements the deep, luscious chocolate for a truly dreamy taste experience.
- Versatile Dessert: Perfect as a snack, after-dinner treat, or for sharing at parties and gatherings.
- No Special Equipment Needed: This recipe doesn’t require any fancy kitchen gadgets—just basic tools you already own.
- Customizable: Easy to tweak for your preferences, whether you want it nut-free, extra chocolatey, or with a crunchy twist.
Ingredients You’ll Need
The beauty of these Chocolate Peanut Butter Dream Bars is in their simplicity. Each ingredient plays a starring role, combining to create a smooth, rich texture and balanced flavor that’s anything but ordinary.
- Peanut Butter: Choose creamy for a silky texture that blends perfectly throughout the bars.
- Chocolate Chips: Semi-sweet or milk chocolates add a melty sweetness that enhances every bite.
- Butter: Adds richness and moisture, helping the bars hold their shape while staying soft.
- Granulated Sugar: Just enough sweetness to balance the peanut butter and chocolate without overpowering.
- All-Purpose Flour: Provides structure and helps create the perfect chewy consistency.
- Vanilla Extract: A splash lifts the flavors and adds a warm, inviting aroma.
- Salt: A pinch enhances all the other flavors and balances sweetness beautifully.
Variations for Chocolate Peanut Butter Dream Bars
The recipe is wonderfully flexible, so feel free to adjust ingredients based on your taste preferences or dietary needs. These variations allow you to make the bars your own without losing the dreamy essence.
- No-Bake Version: Use crushed graham crackers and melted chocolate for an easy, fridge-set alternative.
- Nut-Free Option: Substitute sunflower seed butter for peanut butter to suit allergies.
- Extra Crunch: Toss in chopped peanuts or sprinkle crushed pretzels on top for a delightful texture.
- Dark Chocolate Upgrade: Swap in dark chocolate chips for a richer, slightly bitter contrast.
- Vegan Adaptation: Use coconut oil instead of butter and a plant-based chocolate to make it vegan friendly.

How to Make Chocolate Peanut Butter Dream Bars
Step 1: Prepare Your Pan
Line an 8×8-inch baking pan with parchment paper or lightly grease it to ensure easy removal of the bars later.
Step 2: Mix the Wet Ingredients
In a medium bowl, melt the butter and peanut butter together until smooth. Stir in the granulated sugar and vanilla extract until the mixture is silky and well combined.
Step 3: Combine Dry Ingredients
In a separate bowl, whisk together the all-purpose flour and salt, then gradually add it to the wet ingredients, mixing just until incorporated to avoid overworking the dough.
Step 4: Add Chocolate Chips
Gently fold the chocolate chips into the batter, making sure they are evenly distributed without melting too much at this stage.
Step 5: Bake the Bars
Spread the batter evenly in the prepared pan and bake in a preheated oven at 350°F (175°C) for about 20-25 minutes, or until the edges are golden and a toothpick inserted in the center comes out mostly clean.
Step 6: Cool and Slice
Allow the bars to cool completely in the pan before lifting them out and slicing into squares for the perfect, dreamy dessert bites.
Pro Tips for Making Chocolate Peanut Butter Dream Bars
- Use Room Temperature Ingredients: It helps everything blend smoothly and the bars bake evenly.
- Don’t Overmix: Overworking the batter can make the bars tough rather than soft and chewy.
- Watch Your Oven: Baking times may vary, so keep an eye to prevent drying out while getting the perfect texture.
- Chill Before Slicing: Cooling the bars completely makes cutting cleaner and neater.
- Try Using Natural Peanut Butter: For a less sweet and more authentic nutty flavor that shines through.
How to Serve Chocolate Peanut Butter Dream Bars
Garnishes
Sprinkle flaky sea salt on top to highlight the peanut butter’s richness or drizzle melted chocolate for an extra decadent presentation.
Side Dishes
Pair these bars with a cool scoop of vanilla ice cream or a dollop of whipped cream to enhance the creamy, indulgent experience.
Creative Ways to Present
Serve on a rustic wooden board alongside fresh berries or cut into bite-sized squares on decorative platters for parties.
Make Ahead and Storage
Storing Leftovers
Store the bars in an airtight container at room temperature for up to 3 days to maintain softness and flavor.
Freezing
Wrap individual bars tightly in plastic wrap and freeze for up to 2 months; thaw them at room temperature before serving.
Reheating
Warm bars briefly in the microwave for 10-15 seconds for a gooey, just-baked feel that melts the chocolate and peanut butter anew.
FAQs
Can I use chunky peanut butter instead of creamy?
Absolutely! Chunky peanut butter adds a delightful crunch and texture variation, making each bite even more interesting.
Are these bars gluten-free?
Not as written, but you can substitute all-purpose flour with a gluten-free blend to make them safe for gluten-sensitive eaters.
How long do Chocolate Peanut Butter Dream Bars stay fresh?
Stored properly in an airtight container, these bars stay fresh for about 3 days at room temperature and up to a week refrigerated.
Can I double the recipe for a larger batch?
Yes, doubling the ingredients works well, just use a larger pan and adjust baking time slightly to ensure even cooking.
Is it possible to make these bars vegan?
Yes, by swapping butter with coconut oil and using dairy-free chocolate chips, you can easily make a vegan version of these dream bars.
Final Thoughts
These Chocolate Peanut Butter Dream Bars truly are a delicious, comforting treat that anyone can whip up anytime. With their rich flavors and delightful texture, they quickly become a favorite go-to snack or dessert. Give this recipe a try—you might just find it’s the dream dessert you’ve been searching for!
PrintChocolate Peanut Butter Dream Bars
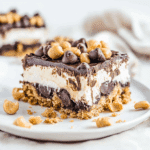
Chocolate Peanut Butter Dream Bars combine rich chocolate and creamy peanut butter in a simple, quick-to-make, soft and indulgent dessert bar. Perfect for any occasion, these bars offer a dreamy balance of flavors with a chewy texture that’s always a crowd-pleaser.
- Prep Time: 10 minutes
- Cook Time: 20-25 minutes
- Total Time: 35 minutes
- Yield: 16 bars 1x
- Category: Dessert
- Method: Baking
- Cuisine: American
- Diet: Gluten Free (if using gluten-free flour substitute)
Ingredients
Basic Ingredients
- 1 cup creamy peanut butter
- 1 cup semi-sweet or milk chocolate chips
- 1/2 cup butter
- 3/4 cup granulated sugar
- 1 cup all-purpose flour
- 1 teaspoon vanilla extract
- 1/4 teaspoon salt
Instructions
- Prepare Your Pan: Line an 8×8-inch baking pan with parchment paper or lightly grease it to ensure easy removal of the bars later.
- Mix the Wet Ingredients: In a medium bowl, melt the butter and peanut butter together until smooth. Stir in the granulated sugar and vanilla extract until the mixture is silky and well combined.
- Combine Dry Ingredients: In a separate bowl, whisk together the all-purpose flour and salt, then gradually add it to the wet ingredients, mixing just until incorporated to avoid overworking the dough.
- Add Chocolate Chips: Gently fold the chocolate chips into the batter, making sure they are evenly distributed without melting too much at this stage.
- Bake the Bars: Spread the batter evenly in the prepared pan and bake in a preheated oven at 350°F (175°C) for about 20-25 minutes, or until the edges are golden and a toothpick inserted in the center comes out mostly clean.
- Cool and Slice: Allow the bars to cool completely in the pan before lifting them out and slicing into squares for the perfect, dreamy dessert bites.
Notes
- Use room temperature ingredients to help everything blend smoothly and the bars bake evenly.
- Don’t overmix the batter to avoid tough bars; aim for soft and chewy texture.
- Keep an eye on oven baking time as it may vary to prevent drying out.
- Chill bars completely before slicing for cleaner, neater cuts.
- Try natural peanut butter for a less sweet and more authentic nutty flavor.
Nutrition
- Serving Size: 1 bar
- Calories: 220
- Sugar: 15g
- Sodium: 90mg
- Fat: 14g
- Saturated Fat: 6g
- Unsaturated Fat: 7g
- Trans Fat: 0g
- Carbohydrates: 20g
- Fiber: 2g
- Protein: 5g
- Cholesterol: 25mg
Keywords: chocolate peanut butter bars, no-fuss dessert, easy baking, peanut butter dessert, chocolate bars